1. Beginner’s Guide to Printing: Graphic Design
PMS / SPOT COLORS
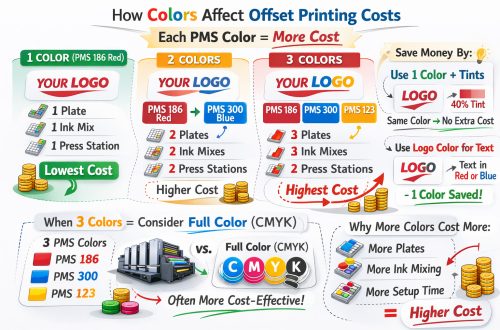
 Pantone Matching System (PMS) colors are categorized by numbers and letters. Using PMS colors means that colors can be matched exactly from computer screen to printer. Many companies have a specific PMS color in their logo and needs to be recreated over several materials.
Spot colors use CMYK colors to create printed materials using offset printing. Every color gets its own lithographic film and its printed in spots onto the product.
IMAGE RESOLUTION
Image resolution can be determined using two things; the DPI (dots per inch) and the PPI (pixels per inch). DPI refers to how man dots there are in an area when it is physically printed out. PPI refers to the density of the pixels on a computer screen. The high the DPI/PPI the better the resolution. Printers require images of at least 300 DPI to print, anything lower than this will be blurry.
CMYK vs RGB
RBG (Red, Blue Green) color mode:
 Computer screens use this combination of colors to make other colors when mixed.
CMYK (Cyan, Magenta, Yellow, Key/Black) color mode:
 When printed these process colors are mixed and toned to create other colors. This color model is used in full color and offset printing. It can be difficult to see what a CMYK design will look like when it is printed because screens display images in RGB.
TYPOGRAPHY

It’s important to do some research when it comes to fonts. You should know what words like “sans serif” mean and how they make people feel when they see information in this font. It is important to try not to use more than two different type styles on one design and that the fonts chosen do compliment each other. For printing purposes, it is important to outline your fonts using your graphic design software so that they can be recreated without needing the same program or files.
TEMPLATES
 Depending on the product you want to create a design for, you will need a template. The template will help designers match up their design with the exact size and shape of the product. These templates also show where the folder is cut and how far the bleeds should stretch out to. When printing a full color product, it is important to use a template so you get exact the design you were hoping for.
GRAPHIC DESIGN SOFTWARE
The program used to design images is usually chosen because of the designers preference. The most commonly used are the programs associated with Adobe Creative Suite. Programs like InDesign, Fireworks, Photoshop, and Illustrator are the most widely used. Using programs that are popular can be beneficial to a designer when transferring files and altering others’ work.
BLEEDS
Bleeds are needed when a printed items needs to have the printed image run all the way to the edges of the product. In order to guarantee that an image will be printed to the edge of a paper product it needs to be designed larger than the paper itself. This guarantees that when it is printed that the image runs off of the page and no white borders will be left blank.
CROP MARKS
Crop marks show a printer where to cut the item you are printing. They are typically black lines that appear on the top, bottom, and sides of the graphic design document showing where the edges should be. This helps with centering the image properly and should cut within the bleed.
Now that you know the basics of designing your own images for printing, now you need to know your options for ordering printed products. Check out our post Beginner’s Guide to Printing: Ordering.