Designing a business card isn’t just about choosing fonts and colors. To get a professional, edge-to-edge finish, you need to design your card with bleed. Without it, cards can end up with thin white borders or uneven edges after trimming.
In this guide, we’ll explain what bleed is, why it’s important, and how to set it up correctly, using the common ¼ inch (0.25″) bleed standard.
What Is Bleed in Printing?
Bleed is the area of your design that extends beyond the final trimmed size of the business card. It ensures that background colors, images, or graphics reach the edge of the card after trimming.
Printers cut large sheets down to final size, and slight movement during cutting is normal. Bleed provides a safety margin so those small shifts don’t affect the finished look.
Standard Business Card Size (U.S.)
- Final trimmed size:
3.5 × 2 inches
This is the size the card will be after printing and cutting.
How Much Bleed Should You Add?
A common and safe standard is 0.25 inches (¼ inch) of bleed.
You can apply this in two ways, depending on your printer’s specifications:
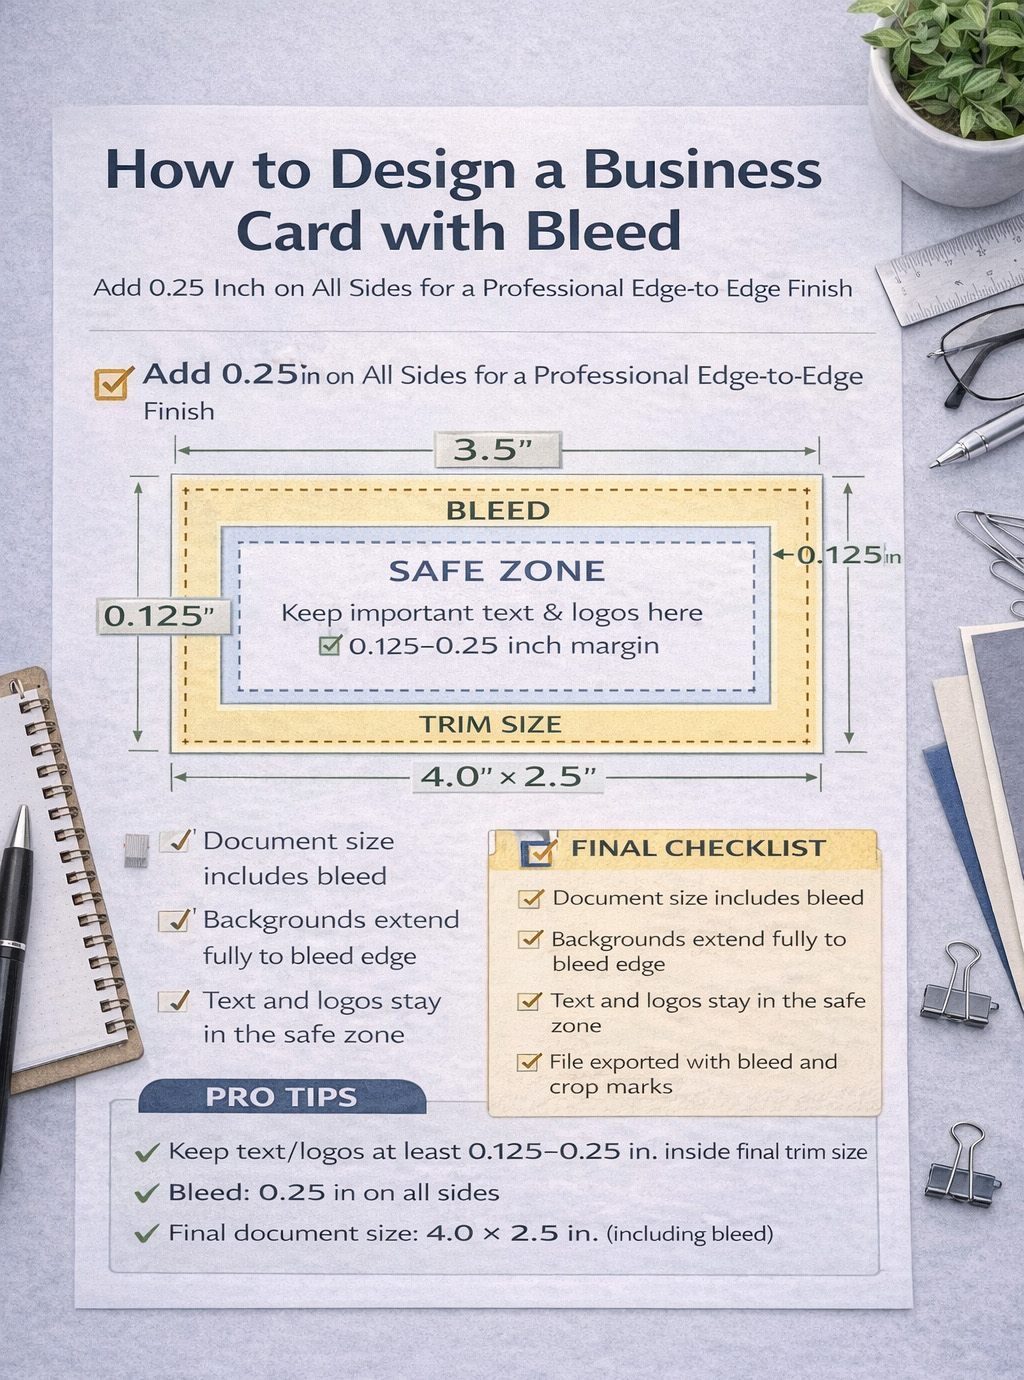
Option 1: 0.25″ on All Sides (Most Common)
- Add 0.25 inches to the top, bottom, left, and right
- Final document size becomes:
4.0 × 2.5 inches
This gives the printer plenty of room for trimming and reduces the risk of white edges.
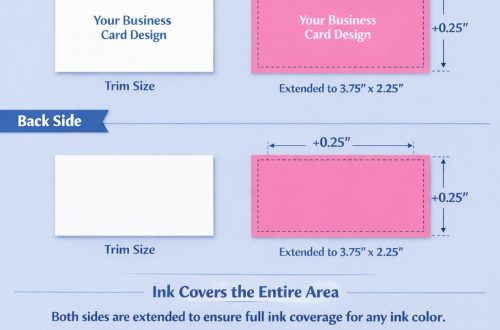
Option 2: 0.25″ on Each Side of the Bleed Area
Some printers describe bleed as “0.25 inches on either side,” meaning:
- The design extends 0.25″ past the trim line on each edge where the ink touches the edge
- The total extra size is the same as option 1
- Final document size will vary, but depending on the bleed side(s), it will become:
3.75 x 2 inches (1 bleed on either left or right side)
3.5 x 2.25 inches (1 bleed on top or bottom side)
4 x 2 inches (2 bleeds, 1 on left; 1 on right side)
3.5 x 2.5 (2 bleeds, 1 on top; 1 on bottom side)
Always confirm with your printer, but both approaches result in the same practical setup.
Don’t Forget the Safe Zone
In addition to bleed, you should define a safe zone inside the trim area.
Safe zone guideline:
- Keep text and logos at least 0.125–0.25 inches inside the final trim line
This prevents important information from being cut off.
Visual Breakdown
┌─────────────────────────┐
│        BLEED            │  ← 0.25"
│  ┌───────────────────┐ │
│  │   TRIM SIZE       │ │  ← 3.5 × 2 inches
│  │  ┌─────────────┐ │ │
│  │  │ SAFE ZONE   │ │ │
│  │  └─────────────┘ │ │
│  └───────────────────┘ │
└─────────────────────────┘
Setting Up Bleed in Design Software
Adobe Illustrator / InDesign
- Set bleed to 0.25 in on all sides when creating the document
- Extend backgrounds and images to the bleed line
- Export as PDF with bleed and crop marks enabled
Canva
- Enable “Show print bleed”
- Extend backgrounds beyond the dotted trim line
- Download as PDF for print
Photoshop
- Increase canvas size by 0.5 inches in both width and height
- Keep important elements inside the safe zone
- Save as a high-resolution PDF or TIFF
Common Bleed Mistakes to Avoid
- Not extending backgrounds into the bleed area
- Placing text too close to the edge
- Confusing bleed with margins
- Exporting without bleed enabled
These mistakes often lead to reprints or disappointing results.
Final Checklist Before Printing
✔ Document size includes bleed
✔ Backgrounds extend fully to bleed edge
✔ Text and logos are within the safe zone
✔ File exported with bleed and crop marks
✔ Printer specifications confirmed
Conclusion
Designing a business card with bleed is a small step that makes a big difference. Adding 0.25 inches of bleed on all sides helps ensure your cards look clean, professional, and polished every time.
If you’re unsure, always check your printer’s guidelines or ask before submitting your file.
At Smart Resolution, we do confirm when you upload a file whether or not it meets the requirements. If you order a product with a visual editor, the system will show you in real-time whether or not your file contains errors. If you’re feeling up to the challenge, try setting up your business cards with bleed with one of the software listed above, and then either order your set of affordable full color business cards with bleeds or a set of premium full color business cards with bleeds in just a few clicks. You’ll be delighted by the result. We guarantee it!